6.1.1 Creating Delivery Server
Pre-Requisites
-
Create an email account for your domain in your host server(this will fill some field information required for setting your delivery server)
-
[OPTIONAL] Create a Bounce Server if required.
To create a delivery server follow the steps provided below:
-
On the left side menu click Servers > Delivery Server
-
Click on Create New Server.
It displays the list of all servers that you create in DooxMail. -
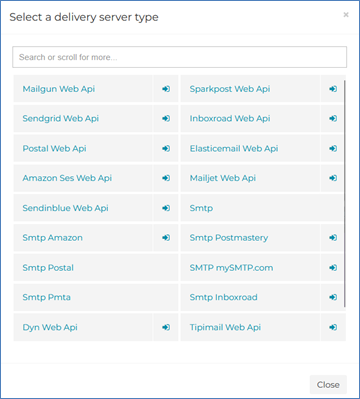
Select the delivery server type
-
Enter the information details the fields;

-
Name: Enter a name specific for a service for example; Host SMTP
-
Host Name: Enter the outgoing server as the hostname, which you can get from your configured email ID for your domain
-
Enter the Username and Password that you set up for the email account you created for your domain.
-
From email: You can enter this email account created for your domain or another account such as info@, sales@ etc.
-
[Optional] From name : Enter your full name or company name instead of email ID
-
Bounce Server: Select the bounce server from the list of bounce servers that you created. See 6.2.1 Creating Bounce Server.
-
Quota Fields (Hourly, Daily and Monthly): If you have unlimited plan you can skip this and keep it as 0. But if your plan is limited, it is important to add those quotas correctly here.
Without correct Quota information DooxMail will keep sending emails and will not know when to stop.
Verify the other fields and change information if required.
You can also add Warmup plan, Domain Policies and Additional Headers for information on each topic click ![]() icon.
icon.
-
Click Save Changes
-
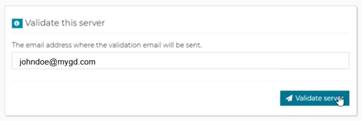
To validate a the server, do the following:
-
Enter the email address and click Validate server
-
To complete the validation, go to your domain server account and validate by clicking on the link provided in the email ID.
Once the validation is completed you will receive the message “You have successfully confirmed the server Vxxxx.inmotion.xxhosting.com”.
-